bilabl’s Outlook Add-in
In this article
bilabl’s Outlook Add-in integrates matter management with Microsoft Outlook. File emails and attachments, log time records, and add contacts or clients directly in Outlook. This tool saves time and keeps matter-related communications organized in bilabl.
Before you start:
Confirm your Outlook version is compatible with the add-in:
- Outlook 2019 or later (Windows or Mac)
- Outlook on the web
- Outlook for Microsoft 365 (Windows or Mac)
A valid bilabl account is required to use the add-in.
Install bilabl’s Outlook Add-in
From your browser
To install bilabl's Outlook Add-in from your browser, download bilabl's Outlook Add-in from the Microsoft AppSource page. Click Get it now, then follow the prompts to install the add-in.
From your Outlook Desktop App
For Classic Outlook (2021 and earlier)
- Open Outlook and go to File > Manage Add-ins.

- In the Add-ins window, search for “bilabl.”

- Click Add and follow the prompts to install.
- Restart Outlook if prompted to activate the add-in.
For New Outlook (2024 and later)
- Open Outlook and navigate to More apps > Add Apps.

- Search for “bilabl” in the Add-ins window.

- Click Add and follow the prompts to install.
- Restart Outlook if prompted to ensure the add-in is fully activated.
Pin the add-in for quick access
Pinning the bilabl add-in keeps its features, such as filing emails or logging time, easily accessible.
For Classic Outlook (2021 and earlier)
- Go to File > Options in Outlook.
- Select Quick Access Toolbar from the left menu.
- In the customization window:
- Choose Commands Not in the Ribbon or All Commands from the dropdown.
- Locate bilabl for Outlook Add-in, select it, and click Add to include it in the Quick Access Toolbar.
- Click OK to save.

- The bilabl add-in icon will now appear in the Quick Access Toolbar for quick access.

For New Outlook (2024 and later)
- Open any email in Outlook to view it in the reading pane.
- In the email ribbon, click the More button (three dots) and select Customize Actions.
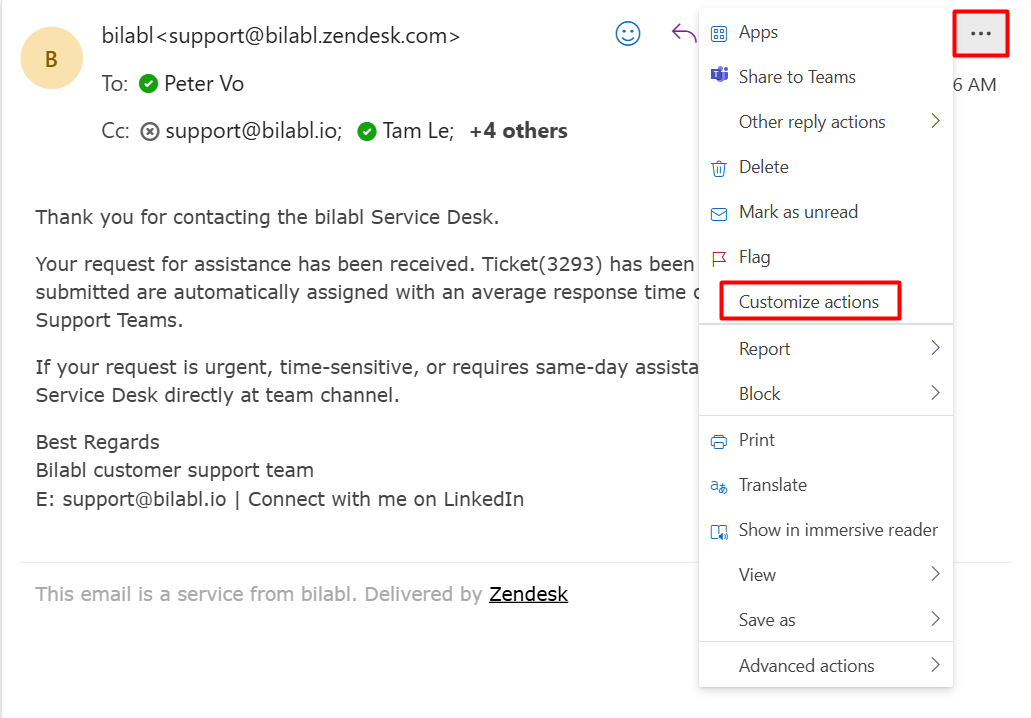
- Check the box next to bilabl’s Outlook Add-in in the Customize Actions window.
- Click Save to apply your changes.
- The bilabl add-in icon will now appear in the email ribbon for one-click access.

- The bilabl add-in icon will now appear in the email ribbon for quick access.

Connect to bilabl
Before filing emails or managing cases, link your bilabl account to the add-in:
- Click the bilabl add-in icon in the Quick Access Toolbar or email ribbon, then select File Email.
- In the setup panel, click Get Started.

- Click Allow to grant permissions.
- Sign in to your bilabl account:

- Select Sign in with bilabl account to enter your email and password.
- Alternatively, use your Microsoft email for single sign-on (SSO) if it matches your bilabl-registered email and your firm has enabled SSO. Refer to the bilabl Help Center for detailed SSO instructions here.
- Once signed in, your account is linked, and you’re ready to use the add-in.
Troubleshooting Tips
Resolve common issues with the add-in:
- Installation Issues: Verify your Outlook version is supported, and you’re signed in with the correct Microsoft account. If Get it Now is unresponsive, confirm Microsoft Store access with your Microsoft 365 administrator.
- Authentication Problems (Email/Password): If login fails, double-check your bilabl credentials or contact your firm’s administrator.
- Authentication Problems (SSO): Ensure the correct Microsoft 365 email is used and SSO is enabled in bilabl. Verify with your Microsoft 365 administrator.
- Add-in Not Appearing: Restart Outlook or reinstall via File > Manage Add-ins. Confirm the add-in is enabled in Outlook’s settings.
- Slow Performance: Clear Outlook’s cache (File > Options > Advanced > Clear Cache) and ensure a stable internet connection.
For additional support, contact support@bilabl.io
Using bilabl’s Outlook Add-in
With the add-in connected, managing matters in Outlook is streamlined. Below are instructions for key features.
Filing emails and attachments
- Open an email in Outlook that you want to link to a specific matter in bilabl.
- Click the bilabl add-in icon in the Quick Access Toolbar or email ribbon.
- Select File email from the add-in panel.
- Use the dropdown or search field to select the relevant matter in bilabl.
- (Optional)Toggle on Add a time entry to capture billable time.
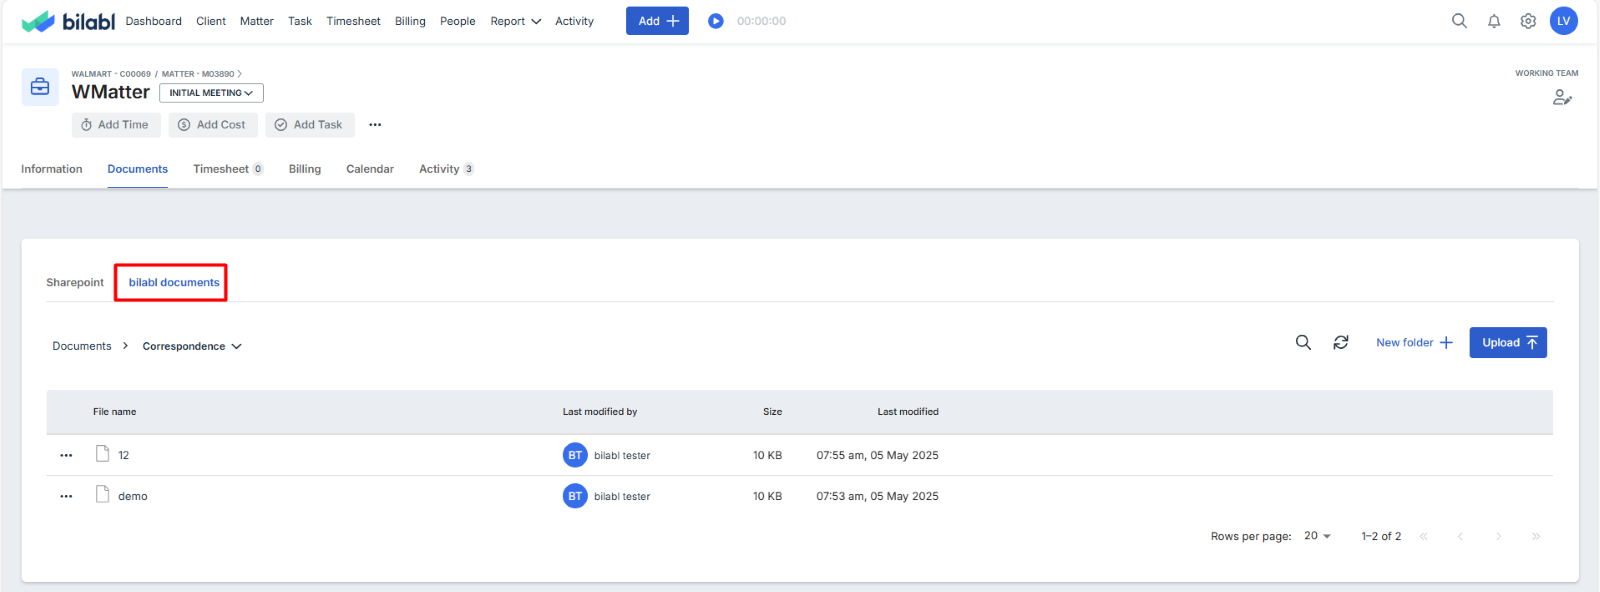
- Click File Email to save. A “Filed to bilabl” tag will appear on the email, confirming it’s linked to the selected matter.

The email will be stored in the matter’s Documents > Correspondence folder in bilabl.
Adding time records
Time records can only be added for emails already filed to bilabl.
- While viewing an email, click the bilabl add-in icon.
- Select Add time.
- Selected the associated matter and enter the duration, task, or description.
- Uncheck the billable box if your time record is non-billable.
- Click "Save" to log the time record. A confirmation message will appear, and the record will be reflected in the matter’s billing records in bilabl.
Tip: Enable the Add a Time Entry toggle when filing an email to log time simultaneously.

Creating new Contacts from emails
- When viewing an email, click the "Add Contact" in the bilabl add-in panel.
- The add-in will auto-populate the contact’s name and email from the email.
- Add any additional details (e.g., title, phone number) if needed.
- Click Save to create the contact in bilabl. If a duplicate is detected, a prompt will allow you to confirm or view the existing contact.

Enabling matter folder management
This optional feature organizes emails into a client- and matter-based folder structure in Outlook (disabled by default).
- Open the add-in and select Settings.
- Toggle on Matter Folders in Outlook.
- Once enabled, emails are organized in Outlook under: bilabl > Client Folder > Matter Folder.

If you enabled the Matter folders in Outlook setting in the Outlook add-in, a client and matter folder will be created in your Outlook folder hierarchy. To locate filed emails:
- In Outlook, go to the Folders pane in the left navigation.
- Open the bilabl folder, then navigate to the relevant Client Folder and Matter Folder to locate filed emails.

To disable the folder management, please follow the steps below:
- Open the add-in and select Settings.
- Toggle off Matter Folders in Outlook.
- When prompted, click Turn Off Matter Folder to confirm.
Note: Disabling Matter Folders syncs filed emails to bilabl without creating folders in Outlook.
Uninstall bilabl’s Outlook Add-in
Uninstalling the add-in will not affect filed emails or matter folders stored in bilabl.
- Open Outlook and go to File > Manage Add-ins (or Add-ins > Add Apps, depending on your version).
- Locate bilabl’s Outlook Add-in in the Add-ins window.
- Click Remove or the ellipsis (...) next to the add-in and select Remove.
- Confirm the removal. The add-in will no longer appear in Outlook.
For further assistance, visit the bilabl Help Center or email support@bilabl.io.